Saturday, May 4, 2013

30 Photos, 30 letters...Inspiration: 30 years of marriage!


My parents' big 30th wedding anniversary is coming up in a few weeks, and since I live about 3 hours away and grad school is kicking my butt this year, I couldn't throw them a party like I wanted to. so I decided to surprise them by having 30 of their friends send them 30 cards with 30 unique photos! It's a great way to include the most important people in their lives in a meaningful and semi-inexpensive way (stamps are NOT cheap these days!)


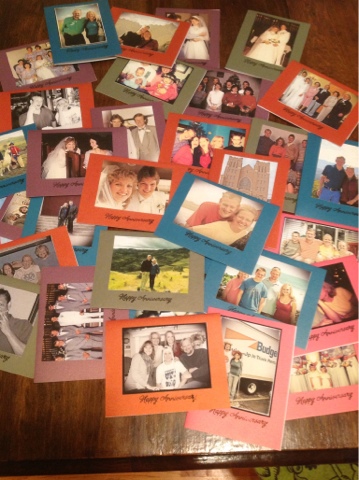
1. I found 30 pictures of my parents over the years, and I edited each picture on my iPad with an app called Photo Toaster Jr.
2. I made 30 cards, and glued the photo that I printed on card stock onto the card using a spray glue from 3M.
3. I stamped "Happy Anniversary" onto each one and let it dry.
4. Meanwhile, I found 30 of their closest friends and family members and wrote a letter to them asking them to write a note in the enclosed card wishing my parents a happy anniversary and to include why they appreciate them, and a funny memory.
5. I filled each envelope to the 30 friends and family members with the letter, the handmade card, and a stamped and addressed envelope to my parents.
6. Now, all we have to do is wait for them to start getting them! :)


Africa Painting....Inspiration: Cat Painting


Well, it was around Christmas time that I decided to finally make the art project I've been meaning to for my roommate. Se went to Africa a few years back and spent about 3 months in Uganda, so I wanted to make this for her but I couldn't find the right media. I didn't want to do it on canvas, or paper...so when I found the cat picture painted on to a wood board with the wood frame...it was destiny!

1. I gessoed over the cat (poor baby!)
2. Then cut out a stencil of Africa from a Honey Nut Cheerios box and sponge painted green acrylic paint around it.
3. Then I did a little sponge painting using letter stencils to get the quote on there.
4. I cut out a heart around a map of Uganda.
5. Hot-glued the map just in the center, then nailed it to the wood. Voila!

She cried when I gave it to her, so I'm pretty sure she loved it! :)


Tuesday, February 28, 2012

Lovopoly...Inspiration: Monopoly

I just finished my Valentine's Day present...yes it's 14 days late, but in a long distance relationship you are able to take your time on these things. I was inspired by the game Monopoly--a favorite game of my boyfriend. I thought about buying him the Lovopoly game online, but I scratched that really fast, and instead decided to make my own. I went out to thrift stores looking for an old Monopoly game set, and couldn't find one, so instead I hit up Target and bought their $11 game.
  1. I took it home and painted the box and the board with gesso.
  2. Then I mixed up some mint green acrylic paint (just the $.59 a bottle kind from JoAnne's)
  3. I then painted the board and replaced all the squares with locations that we've been to or that are special to us (our universities, Bahamas, Chicago, Costa Rica, favorite restaurants--Taco Bell, Don Pablos, etc.) We love renting movies so I made the Utilities squares, "Rental Facilities" (RedBox, and the Library). For the Railroads, I made them: Megabus, Taxi, Cruise, and Teleport. Instead of Jail, I used "Stuck in Traffic" and instead of Free Parking, I used "Spring Break".
  4. Then I went in to Microsoft Publisher and made the Chance and Community Chest cards (which I changed to "Get Lucky" and "Life's Surprises"). I downloaded the fonts that are on the original game cards, which really added to the whole effect.
  5. I then went into Publisher and put our faces in the money. You could just as easily do this with Photoshop, and in fact I'm sure it would be easier. Then I printed it all out on colored paper and used my paper cutter to cut it all up. I made 30 gold-$500, 30 beige-$100, 30 blue-$50, 50 green-$20, 40 yellow-$10, 40 pink- $5, and 40 white-$1. 
  6. I also used Publisher to make the new title deed cards to match the squares on the board. I just used  the same rent amount and hotel and house costs...it was just easier that way.
  7. I went to the store and found some little toys called squinkeys or something like that...I bought the Aladdin ones and made the Aladdin and Jasmine our pieces that we can play with (we dressed up as Aladdin and Jasmine for Halloween)
  8. I painted the box and decorated it with a silhouette of the Chicago skyline and the Taj Mahal, and put pictures of us above the title. 
  9. I sprayed it with a clear coat, gloss protectant and let it dry.
  10. Wrapped it up and will give it to him tomorrow! :)
Hope you can be inspired to make your own Lovopoly board!